contact us

Use the form on the right to contact us.

You can edit the text in this area, and change where the contact form on the right submits to, by entering edit mode using the modes on the bottom right.​


123 Street Avenue, City Town, 99999

(123) 555-6789

email@address.com


You can set your address, phone number, email and site description in the settings tab.
Link to read me page with more information.

Craft patterns

​In which one may learn many useful things, such as how to knit a bat or needle felt a bunny.

Mouse Army

Terri Reinhart

IMG3260.jpg

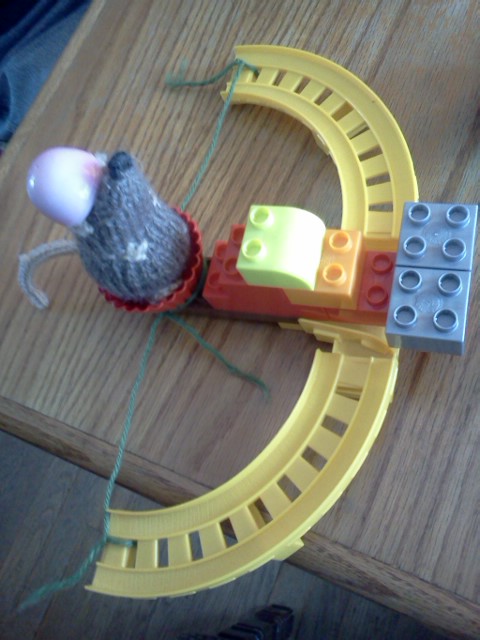
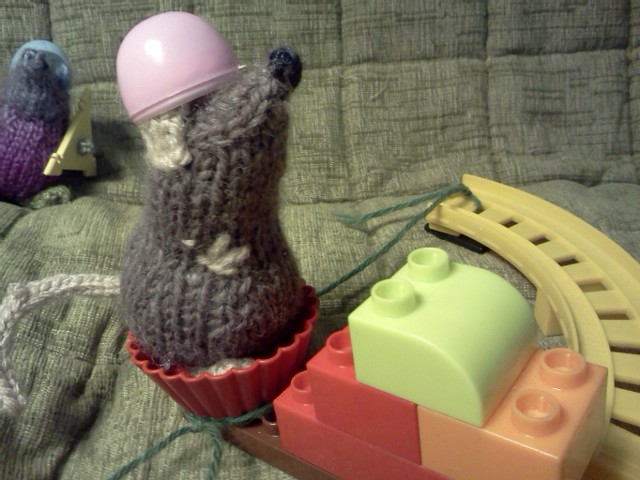
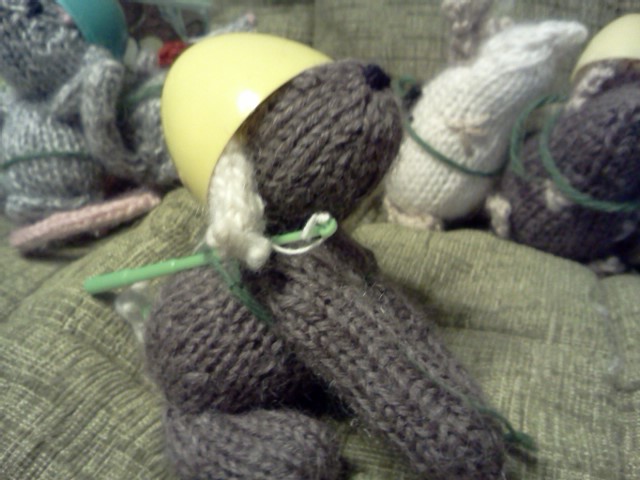
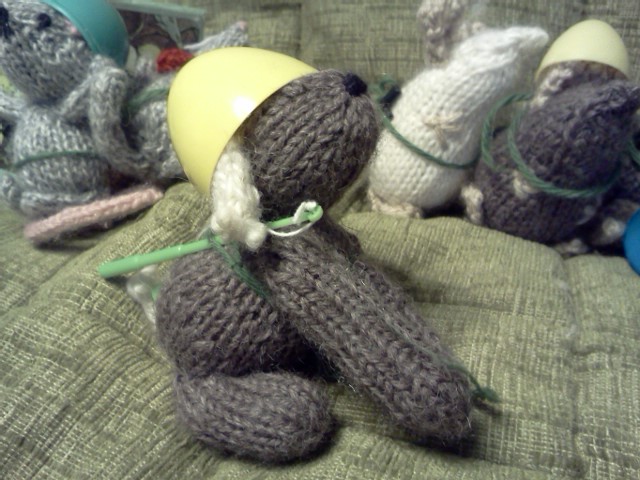
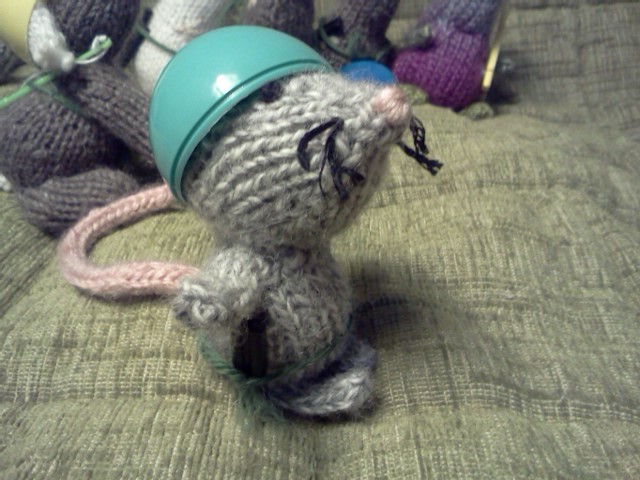
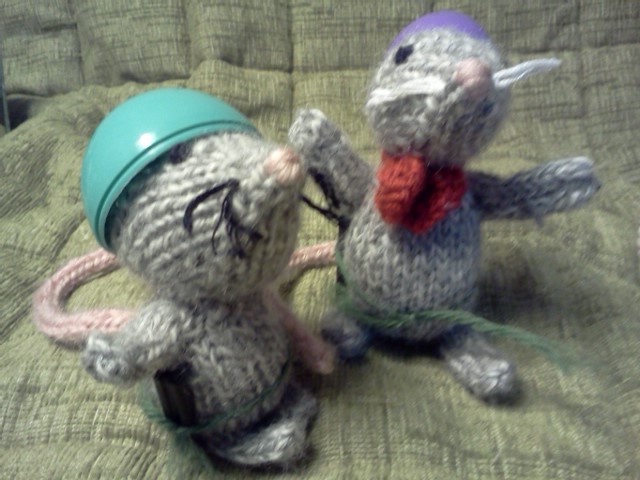
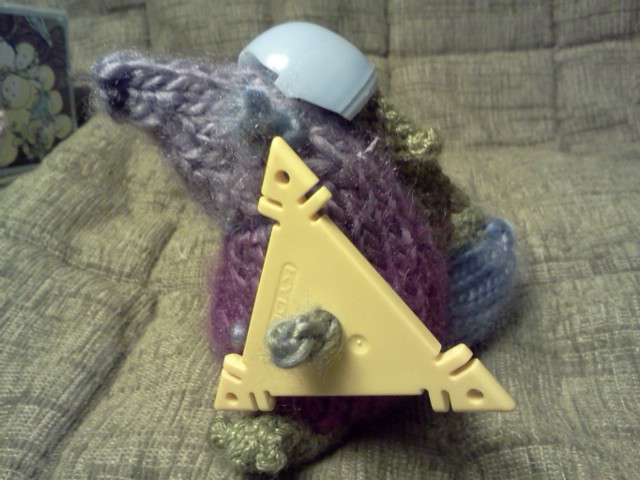
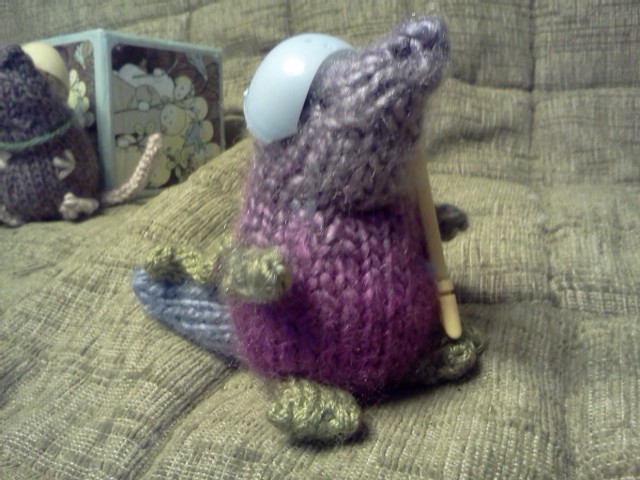
It's been fun getting back into knitting again, especially after finding so many cool patterns through Ravelry. One of the mice is named President Tom, I'm not sure why, it's what my grandsons named it. Other names are Snowy, Crumbs, and Bagel Grease. I can't remember the names of the dog and the dragon. Together they make up President Tom's army and they gather together in a plastic Bat Cave toy that's meant for Batman superhero figures. It was given to us by our neighbor. I'm glad we don't have the superheros that belong to it. The mice are happy there. So are the grandkids.

Links to the pattern pages on Ravelry (and other pages) The dragon isn't on here because I made it up:

https://www.ravelry.com/patterns/library/freddie-the-field-mouse

https://www.ravelry.com/patterns/library/toerag-the-tube-mouse

https://www.letsknit.co.uk/free-knitting-patterns/easy-puppy-trio

Finished Carousel

Terri Reinhart

Did I say I was going to do thirty days of crafting? That didn't last long. I have many excuses, but none of them are very good, so I'll just post the photos I have of the carousel.

Carousel continued...

Terri Reinhart

Or thirty days, more or less, of crafting.

I have been working on crafts everyday, but I've fallen behind in posting. Here are some photos to show you how the carousel horse is developing:

2013-11-10 20.29.26.jpg

Here, of course, is the wire form, made from 20 gauge florist wire. After trying a lot of different types of wire, I settled on this as it is easy to work with and inexpensive. I always start the wire form by folding the piece of wire in half. The middle fold is the nose of an animal or the neck for a gnome.

2013-11-10 20.29.42.jpg

The beginning! In one of the last posts, I explained about how to wrap the folded ends - in this case, the nose and the hooves. Taking the time to do this makes it easier later on to complete those parts without the wire sticking through. DON'T FORGET TO PUT THE STICK WHERE IT NEEDS TO BE BEFORE WRAPPING THE HORSES BODY!! 

Okay. I did forget on two of them - no, three. It was a pain to try and make a hole in the horse after I had felted it firmly. You won't make that mistake because I've warned you.

2013-11-10 20.29.55.jpg

Here's one which is nearly ready to add the top layer of color. These have all started out blue because I had a lot of blue wool I knew I wasn't going to use for anything else. 

2013-11-10 20.30.23.jpg

What do you call a bunch of horses on sticks?  HORSE D'OEUVRES! 

Next - putting on the finishing colors and designs.

30 Days of Crafting - with help from Lexus

Terri Reinhart

I didn't get much crafting done today. I didn't get much writing done, either. But our grandson was over for the day and we had a great time. So, tonight's blog entry is simple. Lexus is giving her critique of the needle felted mice.  

2013-10-23 18.37.22.jpg

30 Days of Crafting: Carousel - a beginning

Terri Reinhart

I love the idea of making a carousel with needle felted horses, but had no idea if I could pull it off. I'm still not sure.  We'll see. Here I will show you the beginnings of how to make the horses and how I plan to create the carousel.

First the horse - I posted the photo of the wire frame yesterday. Here is my trick to forming the wire base for animals, people, and gnomes. Take a piece of wire that is longer than you think you need. Eventually, you'll be able to gauge the length easier. For now, it's better to have it too long than too short. Fold the wire in half.  

The center of the wire will be the head of the figure. If it is a person, the part of the wire going into the head doesn't have to be very long. A half inch or so would be sufficient. With animals, it's a little different.  The center of the wire will form the snout. With a small animal, like a mouse or chipmunk, this allows you to easily make the nose, right at the end of the wire, by wrapping the bend of the wire in the desired color. The horse, however, doesn't have a pointy nose, so the wire simply comes down to form the head.

Bend the wire for the head and neck, then continue, holding both ends of the wire together, to form the front legs, body, and back legs. You should have enough wire to bend it so the back leg wires are also doubled. 

To wrap the wire and begin felting, I always start with the feet and head - or - those places where the wire folds back on itself. Begin by wrapping a very thin piece of wool around one wire, starting before the bend. After you have wrapped past that point, fold the wire and pinch it tight. Continue to wrap both wires together. When making a horse, I do the same thing with each of the four feet. This helps to prevent the wire from pulling through the wool.

2013-11-04 22.11.18.jpg
2013-11-04 22.12.01.jpg

Here is the wire frame for my first carousel horse. I have it bent to the approximate shape I will want it to be. I will still be able to change it.

2013-11-04 21.43.34.jpg

The horse, or beginning of the horse, is sitting on what will be the base of the carousel. I found a lovely wooden lazy susan to use for the base. As it already turns, it solves my first engineering challenge. There will be a post in the center - taken from an old standing lamp.  

2013-11-04 21.44.32.jpg

My plan is to have 4 horses around the edge and 4 more inside the circle. Now, how to make the inside horses go up and down when the carousel is turned? 

More coming tomorrow. This is being posted as I experiment and create it. I have no idea how it will turn out! 


30 Days of Crafting - More Needle Felt Flowers

Terri Reinhart

Here are some more needle felted flowers. They are made much in the same way as the dandelion. I rounded out the wire loop at the top and felted around it in brown, then added the petals. 


2013-11-03 21.54.11.jpg

Here's a small garden. I like this one with the different colors of green. 

2013-11-03 21.54.28.jpg

This next one is a yellow dandelion with a bumblebee.

2013-06-27 21.14.26.jpg

And here is a clover. The clover blossoms are made just like the dandelion flowers, just in a pale purple. I made one plant with stems going every which way, just like the clover in my garden. There are many more leaves on the real plant, but this gives the idea, anyway.  I was going to put this one in the fair, but I like how it looks behind our Buddha.

2013-06-30 18.26.19.jpg

That's a needle felted dragonfly sitting on the clover blossom!  

Next up - step by step photos of a needle felted carousel horse. 

2013-11-03 21.54.55.jpg
needle

30 Days of Crafting - a needle felt dandelion

Terri Reinhart

Here is the finished dandelion so you know what yours will look like.  You'll need wire (22 gauge florist wire), needle nosed pliers, green wool, white wool roving, a felting needle, and a foam mat to felt on. Tomorrow I'll add some photos of other types of flowers made in the same way.

dandelion.jpg

Start by making a wire form like the one below. I use a 22 gauge floral wire. 

2013-10-01 19.29.34.jpg

Wrap the wire with green wool. The ground can be a different color green or it can be the same as the stem. Felt the bottom part. You probably won't have to felt the stem, just wrap it tightly, pulling the last bit thin and continuing to wrap, even with just a few threads of wool. Do not wrap the loop on top!

2013-10-01 19.30.13.jpg

Now comes the fun part! Take a thin "rope" of wool roving - it must be roving - and wind in through the loop over and over, leaving a finger's width of space. Sometimes I thread the wool through a large blunt sewing needle. It makes it easier to go through the wire loop. 

2013-11-02 21.38.12.jpg

Wrap the wool through the loop until it is full. Then you will pull all the loops up towards the top of the wire loop and, with your needle nosed pliers, pinch the wire closed. Your dandelion will look a little shaggy at this point. 

2013-11-02 21.42.46.jpg

Now it's time to clean it up a bit. Add more green to the stem so it is completely covered. Cut the loops with a sharp scissors and trim your dandelion down so it's more or less globe shaped. Don't overdo it. It's easy to see little uneven spots and keep trimming until there's nothing left! 

2013-11-02 21.49.59.jpg

Now you have a nice, neat flower that is ready for leaves. This I'm leaving more to you. I'm not sure my leaves look all that much like dandelion leaves. Anyway, you use the basic needle felting technique with a somewhat leaf shaped blob of wool and you work on it until it is shaped the way you want it - or until it's close enough to what you want. The next photo is a close-up of one of my leaves.

2013-11-02 21.52.27.jpg

30 Days of Crafting

Terri Reinhart

It's November, which means a lot to writers. I signed up this year to be a part of NaNoWriMo or National Novel Writing Month. This is when authors, professionals, beginners, and everyone in between, go into a frenzy and attempt to write 1666 words per day to a total of 50, 000 words for the month.

It's also NaBloPoMo or National Blog Posting Month. The idea is to write a post on our blog every single day for the month of November. I wasn't sure about this one at first, but I'm going to give it a go. Instead of articles, I will post a craft project each day. This is because I'm also getting ready for a craft fair in early December. 

This first picture is my first attempt at a carousel horse.  Eventually, there will be up to 8 horses on a wooden carousel. I will post updates. I also hope to put up as many instructions for making these figures as I can.  


943721_10152053543697275_1312815068_n.jpg

Toad

Terri Reinhart

toad.jpg

This toad reminds me of the toads we used to find in northeastern Colorado.  Kit Hedman took the photo and posted it on Facebook.  A number of people thought it was real and wondered how there could be a fuzzy toad!     

Sally's gnome

Terri Reinhart

Often when someone follows one of my patterns, they end up with a finished project so uniquely their own, I just have to post a photo!  I love the addition of the bird, mouse, and bunny.   Thank you, Sally, for sharing with us!!

​congratulations Sally!  

Knit Gnome Pattern

Terri Reinhart

This is a simple little gnome we used to knit and give as a birthday gift in the kindergarten.  It takes very little yarn and can be made completely from your assortment of odd balls!  ​ (Photo to come shortly)

Materials needed:  odd balls of worsted weight yarn, three different colors plus flesh color; size 5 or 6 knitting needles; yarn or a bit of wool fleece for eyes; yarn for beard; felting needle, yarn needle.

​Body and head:

Cast on 20 sts to start the body.  Knit every row until the piece measures 2 1/4".  This will probably be about 14 rows.  Change to the flesh colored yarn.  Work in stockinette stitch (knit one row, purl one row) until the head measures 1  1/4".  Next row:  Knit 2 together, repeat across row.  Cut yarn, leaving about 8 inches.  With yarn needle, thread yarn through all the remaining stitches, slipping them off the knitting needle.  Pull tight and knot.

Arm and Hand (make two):​

Cast on 8 sts in body color.  Knit every row until piece measures 1  1/2".  Change to flesh color and stockinette stitch.  Work two rows.  Next row, knit 2 together, knit 4, knit 2 together.  Purl next row.  Work four more rows.  Cut yarn, leaving an 8" tail.  With yarn needle, pull thread through stitches and slip sts off needle.  Pull tight and knot.  Don't forget to make the other arm!

Shoes (make two):  

Cast on 6 sts in shoe color.  Knit every row for 2 1/2".  Bind off.​

Hat (make one):​

Cast on 20 sts in hat color.  Knit 4 rows.  Beginning with the next row, knit 2 stitches together at the beginning of every row.  When there are only two stitches remaining, slip yarn through those stitches and pull tight.  Knot.  ​

Sewing:​

With yarn needle, and keeping colors to match whatever part you are sewing, sew the seam from the top of the head down to the end of the piece.  Leave the bottom seam open for stuffing.  Firmly stuff some wool into the head and body.  Weave a piece of yarn through the stitches around the neck.  Pull to form the neck and knot.  Make sure there is  enough stuffing in the head and body so it is firm.  Sew the bottom seam - the vertical seam will be in the middle of the back.  Sew a few stitches up the center to define the legs.  It doesn't take more than 2 or 3 sts.  

Sew the arm seam from the hand down.  The arms don't necessarily need stuffing, but you can stuff the extra bits of yarn into them.​

Sew the hat seam from the tip down.  Fold the shoes in half, length wise, and sew into small rectangles.  You can put a piece of cardboard in the shoes to help the gnome stand up easier.  ​

Sew the arms and shoes onto the body in the appropriate places.  Sew the hat onto the head, set back a little so there is plenty of room for the face.  I prefer to needle felt the eyes in with some dark brown wool.  It is easier to control the needle felting than it is to figure out just where to sew the eyes, but either way is fine.

​Beard:  

Choose a nice mohair, or mohair boucle, if possible, for the beard.  If you don't have access to mohair, any fine yarn will work.  Thread the yarn needle and sewing, make a big loop and secure it with a knot.  Repeat all around face for hair and beard.  Cut loops in yarn, if desired.​

Protecting wool from wool moths

Terri Reinhart

This advice comes from Ruth Walker (www.feltmaker.com)

Make sure your wool is clean before you store it.  After you clean it, put it in a brown paper bag that is double folded and stapled at the top.  Wool moths will chew through plastic bags to get to the wool but they cannot chew through the paper.  

Great.  

Attach a small amount of the wool to the outside of the bag so you know what's in there and don't have to open it to look.

This means that I have a weekend long project ahead of me.  In fact it may take several weekends to accomplish this.  Since I use many colors and types of wool in each project, I'll save out one small basket and watch it carefully for signs of moths.

I have found some sites that tell what to do to get rid of the moths once they find your wool.  Here are some of those suggestions:

1.  Moth larvae do not like light.  Take wool sweaters out of closets and drawers every couple of weeks (life cycle of moth is 21 days) and shake them out or hang them out in the sun.  This might work for our craft wool, too.  If the sun decides to stay out for awhile, I'll try putting my wool in a mesh bag and hanging it on my clothesline.  I'll shake it up a bit for good measure, too.

2.  Wash in hot water (above 120 degrees F).  This is supposed to kill the moth eggs and larvae

3.  Freezing is also supposed to kill the moths.

4.  There are various chemical concoctions available but I cannot speak to how safe they are.  I haven't found anything yet that I would trust to be non-toxic.  

If anyone else has other suggestions, please post them here!  It is so discouraging to open a bin of wool and find that it's being eaten away.  

Needle felted bunny

Terri Reinhart

This little bunny is fun to make.  If you haven't done any needle felting before, this would make a nice first project.  To get started, you will need:

Felting needles - have more than one on hand in case one breaks

Soft sponge as a base for your felting

Wool fleece in grey, brown, or white, with a tiny bit of black and white wool for details

Pipe cleaner

*****

Directions:

Bend your pipe cleaner like this:                        


Begin to wrap the wool tightly around the ear as shown:  


Wrap the wool tightly around the pipe cleaner until you cover the top curve of the ear.  Then bend the pipe cleaner down and continue to wrap both sides together.  Do this with both ears.  It will look like this:

Now you can begin to use the felting needle to secure the wool.  Continue wrapping the wool around the body, wrapping around the bottom curve as you did for the top of the ears.  Use thin bits of wool and wrap tightly.  Secure each layer with the felting needle. The more felting you do with the needle, the tighter and sturdier the rabbit will be.  Wrap both the body and the ears, felting each layer, until it is the size you want.

Pay attention to felting in between the ears and felting the bottom so the bunny can stand up.

At this point, your bunny may look more like an insect.  This is normal.  If you have a six year old son, you might decide to stop here and let it be a bug.  Otherwise, continue...

After your bunny is fat enough for you, begin shaping the head, neck and belly with the felting needle.  Remember, the more you felt in one place with the needle, the more shaping you will get, such as shown around the neck above.

Roll up four small tube shapes out of the wool for feet.  It is nice to have just a little extra wool at the end to hold onto.  This prevents (or helps to prevent) sticking yourself with the needle.  You don't want to do that.  The needles are sharp and also fragile.  It also doesn't really help the design any to have blood on it.  Needlefelt each foot before attaching them to the body of the bunny. 

Here is our bunny with shaping done and the feet in place.  Secure the feet well with the felting needle, adding some thin bits of wool around where they are attached.  This helps so you don't see the connection as much and it will be more secure.

I like adding the upper part of the back legs to the rabbit.  This is optional, but I like it better.  Roll a small bit of wool into a flat circle.  Attach in proper place by back feet as shown:

Attach a bit of a white tail...

Add black nose and eyes and a little white on the tummy.  If you are ambitious and are not giving this to a toddler, you can use tiny black beads for eyes.  You may also stitch  whiskers on it.  I haven't done that yet, but I plan to on my next bunny!

Sleepy Bat

Terri Reinhart

I used a worsted weight tweed yarn for the bodies of the bats and I washed and felted an old black wool sweater for the wings.  You will need this or some black felt.   Size 5 knitting needles.  Also, buttons for eyes and a hook and eye fastener.

Body:  Cast on 20 stitches.  Work in Stockinette stitch for 2 1/2 inches.  Then begin decrease rows:

Row 1:  Knit 1, knit 2 together.  Repeat till the end of the row. 

Row 2:  Purl

Row 3:  Knit 2 together. Repeat till the end of the row

Row 4:  Purl

Row 5:  Knit 2 together.  Repeat till the end of the row.

Row 6:  Purl

You should only have about 6 or 7 stiches left.  Cut the yarn, leaving a 10 inch tail.  Thread through a yarn needle and pull through all the stitches.  pull tight and secure.  You can, at this point, go ahead and sew the back seam.  Do not sew the bottom.

Ears (make two)

Cast on 6 stitches.

Rows 1-4:  Stockinette Stich

Row 5:  Knit two together, knit two, knit two together

Row 6:  Purl

Row 7:  Knit two together, Knit two together

Row 8:  Purl

Row 9:  Knitting, increase one in the first and last stitches

Row 10:  Purl

Row 11:  knitting, increase one in the first and last stitches

Row 12:  Purl

Row 13 - 16:  Stockinette Stitch

Bind off

Feet (make two)

Cast on 5 stitches

Work in Stockinette stitch for 2 inches.

Bind off.

***

A bunch of bats? A bevy of bats?

Finishing:

Lightly stuff the body of the bat and sew across the bottom.  Put the two sides of the ear together and sew.  Sew ears to body (see photo).  Sew the feet to the bottom of the bat as loops so it can hang from a branch.  Cut wings out of black felt.  You might want to try cutting some out of paper first so you can get the size and shape that you want.  Sew on button eyes.  Attach a hook and eye fastener to the wings so that your bat can hang upside down and sleep!

Knitted Owl

Terri Reinhart

I used worsted weight yarn with a bit of texture to it. I’m not sure what kind it is but it was a small ball of leftover yarn from another project. I tend to knit like I cook. I don’t often follow patterns and this is a good example. I was trying to knit a bat and ended up with an owl. As they say in school, if you make a mistake, turn it into something beautiful. Like an owl.


#3 or #4 needles


Body:

Cast on 14 stitches. Knit in Stockinette Stitch until the rectangle measures approximately 7 – 8 inches. Fold it over lengthwise and see if it looks proportionately like a little owl should. Don’t use a ruler unless you just can’t resist. Bind off.


Wings: (make two)

Cast on 6 stitches. Work in Garter stitch.

Row 1: Knit

Row 2: Knit 1, increase 1 in next stitch, knit till the end

Row 3: Knit

Row 4: Knit 1, increase 1 in next stitch, knit till the end

Rows 5 – 7: Knit

Row 8: Knit 1, knit 2 together, knit till end

Row 9: Knit

Repeat these two rows until there is only one stitch left. Cut yarn, leaving a 3” tail, pull yarn through last stitch.


Feet: (make two)

With contrasting color, cast on 5 stitches. Work in stockinette stitch for approximately 10 rows. End with a purl row.

(As with the measurement for the body, use your own judgment here. Some yarns knit up larger than others. Those owls might need longer feet.)

Picot row: Knit 1, yarn over, knit two together, yarn over, knit two together

Next row: Purl, making sure you purl the yarn over stitches, too. You still have 5 stitches on the needle.

Continue with stockinette stitch until you can fold it over lengthwise (see the lovely TOES that the picot stitch makes?) and it is meets the other edge. Bind off.


Beak:

Cast on 4 stitches. Work in Stockinette stitch for 4 rows.

Next row: Knit 2 together, knit 2 together.

Next row: Purl

Cut yarn, leaving a 3” tail, pull yarn through the two remaining stitches.


Fold body lengthwise in half and sew together, stuffing with wool. Pull out the top corners just a bit with your fingers to make the ears show. Sew wings on either side. Fold over feet and sew each one together and then sew them onto the bottom of the owl. I sewed the top of the beak onto the face of the owl then sewed the “point” down as well, making it stick out just a little. I used two buttons for eyes, but if this is for a younger child (younger than age 3), you should embroider the eyes on with black yarn.


Resources for discount wool yarn

Terri Reinhart

When I find a good deal, I like to share it with you all.  As often as possible, I do like to patronize the small knit shops and keep them in business.  However, there are times when I just can't afford good yarn from these shops.  Especially if I have a large project or I am doing something crazy like knitting felted slippers for the entire family.  Then I look at these sites:

www.knitpicks.com  - lots of good wools, sock yarns, and a good assortment of colors.  They also offer free shipping on orders of $50.00 and over.

http://www.thesheepshedstudio.com/ - this site has Brown Sheep yarn and mill ends of wool roving from Brown Sheep, among other things.  I am impressed with their prices!  For those of you who know Brown Sheep yarn, their "Lamb's Pride" yarn, both worsted weight and bulky weight, are only $3.00/skein. 

http://www.paradisefibers.net/Discount-Yarn-mill-ends-s/125.htm - I'm just beginning to look through this one, but it does look promising!

When I find more, I'll keep you posted!!


Things to knit that you would never imagine knitting

Terri Reinhart

I figured that I should add these websites to this page. There are patterns out there for knitted items that are unusual, to say the least.  I doubt that you would use any of these in a Waldorf Kindergarten.  I just enjoy the creativity!  There are some patterns that are too "out there" for me!

But here are a few to enjoy:

http://blog.craftzine.com/archive/2008/08/how_to_knit_a_dissected_rat.html

http://blog.craftzine.com/archive/2008/01/dissected_fiber_frog.html

http://www.darkroastedblend.com/2008/10/strange-knits-and-yarn-monsters.html

http://knitty.com/ISSUEfall02/PATTveganfox.html

http://www.craftycrafty.tv/2007/05/scary_knitted_animals.html

http://api.flickr.com/services/feeds/photos_public.gne?id=91821907@N00&format=rss_200

I just showed these pictures to a couple of eighth grade boys and received their approval.  Unfortunately, with just a few exceptions, the patterns are not online, but have to be purchased.  I suspect, however, that with just a little trial and error, most of these could be figured out by other knitters.  The Vegan Fox pattern is online and I am hoping to make one of these soon. 

How to make a book binder's awl

Terri Reinhart

When I began teaching bookbinding, I needed to provide my students with proper tools, including a book binder's awl for piercing holes in each section of pages.  I couldn't afford to purchase enough for a class, so I decided to make my own.  It's ridiculously easy.  Basically, I just glue a needle in a cork. 

For each awl, you will need:  one cork - champaigne corks and corks from cream sherry work especially well, one needle - size 2 crewel needles, one pair of pliers, and tacky glue.

Using the pliers, make the hole in the cork for the needle by pushing the needle in point first.  Then take the needle out of the cork, put a bit of glue at the "eye" end of the needle and push that end in the cork, using the pliers.

What was so lovely is that I found these awls to be much, much better than the professional book binder's awl that I purchased! 


One more note:  I use the size 2 crewel needles to sew the books together, too.  By the time I've sewn two or three books, the needle is slightly curved.  This is what I want!